Showing posts with label IAR 112. Show all posts

Monday, May 2, 2011

Sketches and Renderings from Class

I thought I would take the opportunity to upload some images of renderings and observational sketches from the fast semester. I started working a lot with pen rather than pencil and really enjoy the results that have occurred.


Comparison between Falling Water and Monticello.  Exterior.  Plan.  Materials, interior floor and exterior surface.  Living room.

Sketch of front of Monticello

Foyer of Monticello.  Front Elevation, Fireplace wall elevation and Detail of Crown Molding.

Architectural details that I found interesting at Monticello

St. Mary's House, sitting on the floor next to the kitchen door looking in.

St. Mary's House, sitting in the middle of the sanctuary looking towards the alter.

Perceived perspective at St. Mary's looking towards the front door.

Scale figures, sketched while sitting at Starbucks.

Scale figures, sketched while sitting at Starbucks.


Rendering on another student's wire frame.

Rendering of the basement of Gatewood.

Tuesday, April 26, 2011

St. Mary's House - A writers Retreat Drawings and Ideas

These are the original drawings that I did for St. Mary's writers retreat.  They may be easier to see than the final boards that I have uploaded to the blog.  There is additional information on the final boards that is not on these drawings.  I've also included some commentary and thought process as to why I have laid the space out as I have. 


First floor plan.  The office is at the front of the building to the left.  The space can accommodate a conference table for 8 as well as an office/writing desk.  The living room is directly behind the office.  There are stairs up to a loft.  The Living space is large enough to accommodate intimate seating at the fireplace, a sitting area in the center of the room and a small space for dining for two.  The bedroom is at the back of the living space to create more privacy with an en-suite bathroom as well.  The kitchen connects the living room to the public reading room in the rear of the structure, far right.  This allows the kitchen to function for both spaces and also create a privacy gradient between public and private spaces.  The public reading room has been opened up to the outdoors with french doors and windows all around.  If possible a screen porch on the back would be ideal.  The reading space also has a built in desk for writing, chair storage, and a public bath.  The space can also be used for dining for larger crowds.
Second floor loft plan.  Writing loft is at the front of the house to the left.  The rear loft can act as secondary living, reflecting space, or additional sleep space if necessary.  The rear loft is open to the central portion of the public reading space and could be used as an elevated reading platform as well.
Section Elevation looking east.  Shows the Kitchen, office, living, reading and second floor loft spaces.
Section elevation from inside the public reading room looking south.  This shows how the ceiling is vaulted in the center and how the second story loft interacts with the space.  The writing desk is in the middle and kitchen door is on the right side. 
Section elevation from the living room looking north.  This shows how the second story loft interacts with the kitchen below as well as with the living space.  The window in the loft is 6' tall, the addition of a scale figure could have made the loft space more clear.
Elevation of the west wall.  The fireplace is central.  Book cases with storage underneath flank the fireplace and continue up to the ceiling of the loft which is 9'6".  Next to the book cases are the reflecting nooks.  These provide a space for writing and reading as well as additional seating when necessary.  Keeping this section of the space open from front to back maximizes light in the space.


Perspective of the public reading room.  This space is large enough to accommodate 40 individuals seated.
Living room looking west.  A two point perspective that shows how the stairs, loft, balcony seating area, and built ins work together.  Scale figure to the right shows the scale of the space and how open and high the ceilings are.
Living room looking back towards the kitchen on the left, bedroom in through the door on the right.  The kitchen is a galley style kitchen and connects the private quarters to the public reading room.  The allows the kitchen to function for bot public and private spaces while maintaining a privacy gradient for the more personal spaces.
Second floor loft looking south towards the front of the house.  This view shows another reflection nook and writing desk as well as more built ins for storage.  The addition of a scale figure would help show how an individual would interact with the space.  The distance to the top of the window from the floor is 6', and the distance to the top of the book case from the floor on the right is 5'5".
My original Parti for the project.  Reflect is the main concept.  Areas of reflection for the writer are key.  The environment is very muted and filled with earth tones.  The richness and life comes from how one lives in and utilizes the space.

Tuesday, April 5, 2011

Monticello - Plan from memory and ponderances.....

From our trip to Monticello and Falling Water, I chose to write about Monticello.  Monticello is a more formal layout which resonates more with and how I live.  There is a privacy gradient from formal to personal space which I enjoy in a home.  I am most intrigues in the ways that Jefferson built the house.  The structure was a constant design evolution, Putting up and Tearing down.  His does seem to be an extreme case though.  The technologies that he used intrigue me.  Using octagonal rooms to avoid dark corners and give you more usable wall space.  I didn't think this would work in theory, yet in actuality it does so quite well.  Triple hung windows, aid in ventilation as well as act as impromptu doors.  The brick pattern, which ads strength to the structure.  I really enjoy tall ceilings and the relationship to how one feels in the space.  What is tall enough and what is too tall or not tall enough.  This concept was definitely challenged at Falling Water.  The ceilings there were 6'4", which I thought would be extremely oppressive, yet they were not.  I was most perplexed in Jefferson and his "perfect outside" of his home related to the many un-resolved interior issues.  Such as window sizes, Moldings and trim not being correct.  I would have thought that he could have this figured out.  Seeing a classical structure such as Monticello and comparing that to A modern structure such as Falling Water was amazing. 

Thursday, February 17, 2011

Exploring Materials and Value

Textile               Wood                    Carpet              Stone

For this project we visited the materials library and chose a textile, a wood, a carpet, and a stone.  We then rendered these items at actual size and at a scale of one inch equals one foot and applied a value scale to them as well.  Each section is 2 inches square.  We used graphite and pen on an 18 x 24 piece of paper.  My textile was my most difficult item to reproduce and took lots of trial and error.  I finally magnified the textile to analyze how it was made, which made rendering it much more approachable.  Stephanie showed us some of her rendering methods from when she was in undergrad and I applied some of her techniques to my carpet sample.

My materials are:

Textile:  Knoll, Gracenote Sheer Drapery Fabric D222/4 Topaz
Wood:  American Hardwoods, Sustainable Solutions, Walnut, Juglans Nigra
Carpet:  Shaw, Breezy Bahama, Trophy (color 0020), Style 5C110
Stone:  Ice Stone, Desert Pearl

Value Study number One


Value study number one for the semester. I utilized three different techniques in three different mediums. Graphite, Pen, and Marker were the mediums and Shaded, Hatched, and Stippled were the techniques. Pen and Marker are both new mediums for us this semester. I enjoyed working with these new tools and learning about them and how to successfully use them. Each row of technique is composed of seven one inch squares. The size of the composition is 18 x 24 inches.

Thursday, February 3, 2011

COLOR WEEK!!!

Last week was color week.  We worked with ColorAid paper, which is a calibrated, silk screened, color paper. 


My first combination.  Finding the middle color.
Composition two.  Overlap, using the middle color.  This is when it started to make sense.
Five Square.  Taking it to the next level.  Five squares all overlapping to create middle colors.
Composition four.  Color Triad.  The middle color of three colors.
Combine all of the above to create our very own color palate that we utilize during the balance of the semester.  Here we utilized middle colors and triad middle colors.
Final composition.  Here we used the colors in our color palate to create an abstract representation of the light during the four seasons.  Spring, Summer, Fall, Winter - from top to bottom.

During the week we all learned a great deal about color and how to work with it.  There were lots of surprises, lots of magic moments, some frustration, and much much gained knowledge.  I can't wait to work with the palate that I created.

Saturday, January 15, 2011

A new Semester, A new blog Header

Our first Design Visualization assignment of the semester - design a new header for your blog that represents you as a designer.  I was much more excited about this this time than last time.

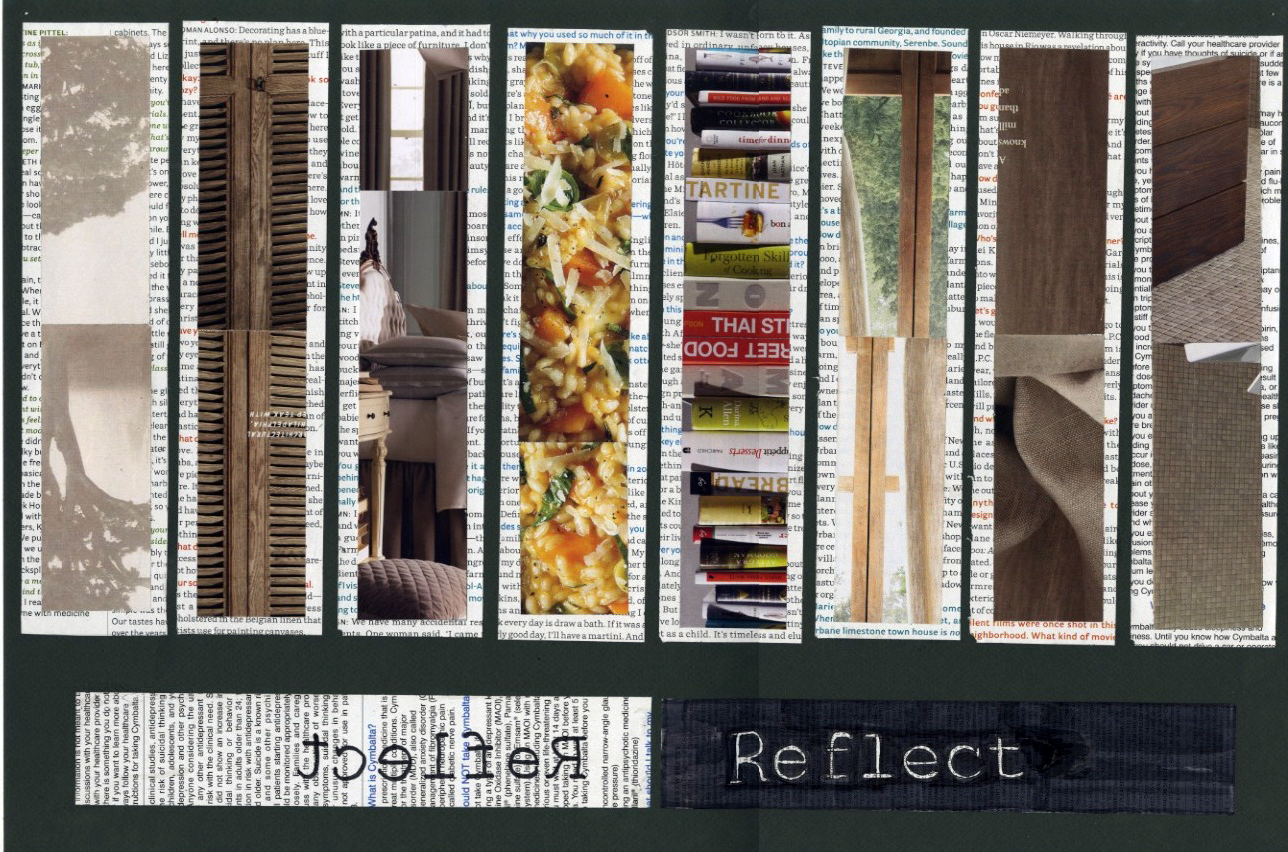
I'm still a "young" designer so I chose to focus on skills that I have learned and developed so far.  I have not yet really worked with color.  New tools for the semester were Gray markers.  I chose this as my start and thought that the grays would relate to my current blog design.  I played around with the markers quite a bit, layering, overlapping, just experimenting.  This is how I approach most projects.

I created a background of gray stripes, some light, some dark.  Some overlap, some are multiple layers.  Then I created a rectangular grid overlay, for some structure and definition.  Both of these aspects represent me as a designer.  I tend to layer ideas and develop concepts over time and I feel this represents that aspect of me.

I took this background and scanned it into my computer and played with different fonts.  I chose to use Plantagenet Cherokee.  I enjoyed the structure of the letters as well as the slight playfulness they have.  This represents me as a designer since I like structure and a little irreverence or playfulness.  I usually want this to be understated and not a focal point, just something small that I enjoy.

Overall my new blog header shows depth, character, refinement, mistakes, layers, and a playful attribute.  These are all things that happen in design and embody the designer that I currently am.